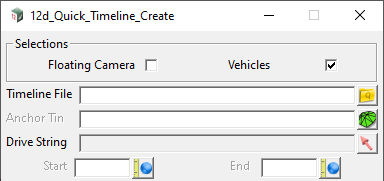
Quick Timelines is a simple tool to easily create a timeline along a selected drive string. The user may choose options such as a fixed or floating camera and the addition of vehicles.
BIM => Visualisation => Timelines => Quick timeline

Selections
Floating Camera
- If ticked, the camera will follow the target (Drive String) and the user may zoom/orbit the camera position during playback.
- If not ticked, the camera will remain static during playback.
Vehicles
- If ticked, turns on appropriate fields for setting up vehicles.
Timeline File
- Enter a name for the timeline file.
Anchor Tin (optional)
- Vehicles in the Mesh Library have defined anchor points on each wheel. The Anchor Tin sets the z-value of each wheel as it travels down the Drive String, and allows vehicles to follow the terrain, such as superelevation.
- If no Tin is selected, the Drive String will be used to set the vehicle Z-Value.
Drive String
- The selected string will control motion of the camera and vehicles.
Start Ch / End Ch
- When you select the Drive String, the Start & End chainage will be populated. This defines the start/end of the timeline and may be changed if required.

Global Options
Speed for journey (km/h)
- The speed is used to calculate the timeline duration (in seconds) based on the length of the Drive String.
Calc
- Hitting <Calc> will calculate the timeline duration, based on Drive String length and Vehicle Speed.
Vehicle separation (m) (optional)
- Set a constant separation between vehicles, rather than the randomly determined spacing.

Group Options
Name
- Name given to the Vehicle Group. This allows vehicles to be easily toggled on/off during playing.
Start
- The time (in seconds) to start the group. This is useful for delaying the display of a particular group.
Create Intersection (stop) strings for group vehicles?
- If ticked, a Chainage Timeline string is created for each vehicle. The strings will be placed on a model prefixed “TIMELINE” as follows;
- TIMELINES <Timeline name> <Group name> <Lane number>
Chg
- Chainage on Drive String to stop the Vehicle Group.
Time
- Wait time (in seconds) to hold the Vehicle Group.

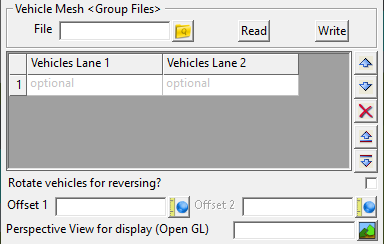
Vehicle Mesh (Group Files)
File
- Select the Vehicle File to use. If no file exists, then enter a name to create a new Vehicle File. The Vehicle File is simply a pre-selected list of vehicles that can be used to quickly populate the Vehicle Grid.
- To see available vehicles; BIM =>Visualisation =>Meshes =>Mesh library
Read
- Reads in the file and populates the Vehicle Grid.
Write
- Writes out the current Vehicle Grid to a vehicle file.
- Note: It is recommended to enter a new file name. Any changes made to the Vehicle Grid (ie. remove a vehicle) will overwrite the Vehicle File.
Vehicle Grid
- Displays the current Vehicle Group. The vehicle order may be changed and/or vehicles removed from the list. During playback, vehicles are displayed in the same order as listed.
- The vehicle list may be saved by entering a file name and hitting <Write>.
Rotate vehicles for reversing?
- If ticked, the vehicles will run in the opposite direction to the drive string.
Offset 1
- Enter an offset from the drive string (+ve left; -ve right).
Offset 2 (optional)
- Enter an offset from the drive string (+ve left; -ve right).
Perspective View for display (OpenGL)
- Select a Perspective View to display the timeline playback.

Append
- You must hit Append before saving the timeline file.
- Additional timelines may then be created (eg. using a different Drive String and vehicles) and appended to the current timeline file.
Write
- After creating all the timelines, hitting Write will save the timeline file.
Once the timeline file has been created, it can be played back and recorded under View =>Visualisation =>Timelines =>Play
The timeline can also be edited under View =>Visualisation =>Timelines =>Edit