Tables in 12d Model can be created, associated with, and updated from, a CSV file. Additionally, a Table created in 12d Model can be exported to CSV.
The CSV file should be delimited by a comma, or semicolon, or tab. The table Title and Column Headers may also be included in the CSV file.
An example CSV is shown below.
Point Setout
Name,X-Coord,Y-Coord
A,256190.744,7411594.163
B,256222.558,7411571.907
C,256232.490,7411543.916
- Title row: Will be used for the table Title.
- Header row: Will be used for the column Headings.

To create a table, go to: Cad => Table => CSV file – 1 table
Set the Name, Model, and Style for the table.
Select the CSV Source File to use as the data source.
The Column Separator must match the delimiter used in CSV file.

Use Auto Sizing to quickly setup the table. If needed, the row/column sizes can be manually changed later.
Location sets the insert point for the table.
Use Title and Use Header to use title and header rows from the CSV. Tick these on if the Title and Column Headers are included in the CSV, and you want to include them. These are both optional and not required in the CSV file, or will be skipped if they do exist.
Number of Rows and Number of Columns may be left blank as they will be automatically set by the number of rows/columns in the CSV file.
Existing tables may also be edited, go to: Cad => Table => Edit
Editing the Table allows you to update properties such as;
- Add/Delete rows and columns,
- Change the Table Style,
- Turn the Title and Headers on/off,
- Edit the cell contents,
- Recalc to update contents from the CSV file.

As the CSV file is linked to the Table, when the CSV file is updated you can update the Table contents without having to open the editor (toolbar).
From the menu, go to: Cad => Table => Recalc data source
Add the following lines to the CSV, and save the file. Then do a Recalc data source.
D,256260.480,7411536.919
E,256270.927,7411493.013
F,256280.531,7411492.567

Note: As 12d Model creates an association between the Table and the CSV file, it is important not to rename or move the file. However, if needed you can re-associated a CSV file with the table.
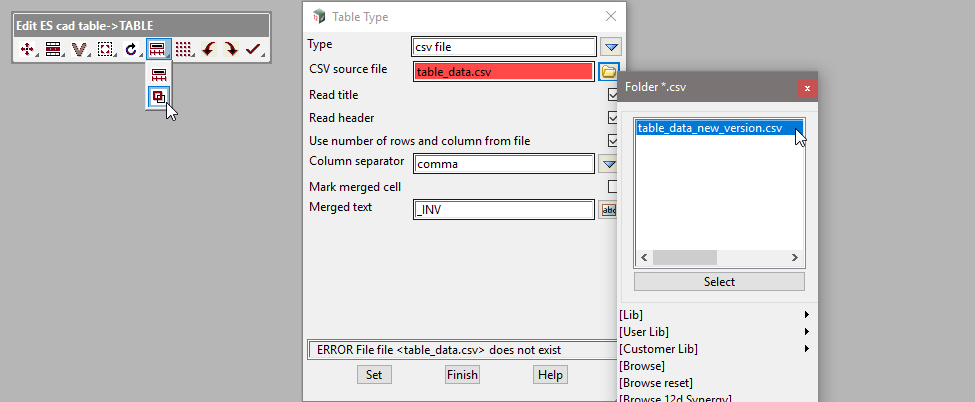
On the Edit Cad Table toolbar, go to: Properties > Type reselect the CSV source file.

For Tables that have their content generated in 12d Model, such as Cad => Table => Super Alignment, you can export the values out to a CSV file.
From the menu, go to: Cad => Table => Table to CSV

Resulting CSV file.
"Point Setout",,,
"Name","XCoord","YCoord","Radius"
"A","256190.744","7411594.163","5"
"B","256222.558","7411571.907","10"
"C","256232.490","7411543.916","8"
"D","256260.480","7411536.919","12"
"E","256270.927","7411493.013","5"
Merging Cells
Cells may be merged by adding the following codes in the CSV file. Note, except for the merge code, the cell must contain no data.
- _INVR : Row Merge, with Cell to the left
- _INVC : Column Merge, with Cell above
- _INVB : Block Merge, with Cell’s to left/above
The CSV shown below has examples of Row, Column, and Block merging.
TABLE TITLE
HEADER A,HEADER B,HEADER C,HEADER D, HEADER E
ROW 1,_INVR,_INVR,CELL 4A,CELL 5A
ROW 2,CELL 2B,CELL 3B,CELL 4B,CELL 5B
ROW 3,CELL 2C,CELL 3C,_INVR,_INVR
_INVC,CELL 2D,_INVC,_INVB,_INVB
_INVC,CELL 2E,_INVC,_INVB,_INVB
