Importing DWG/DXF Files into 12d Model

The DWG/DXF Input Panel in 12d Model is designed to support the import of linework, symbols, strings, and triangulated face data from external CAD files. This is particularly useful when incorporating third-party data into your project, such as detail surveys or pre-built triangulations.

Accessing the Panel

To import DWG, DXF, or DXB files:
Go to File > Data Input > DWG/DXF/DXB.

Selecting the File

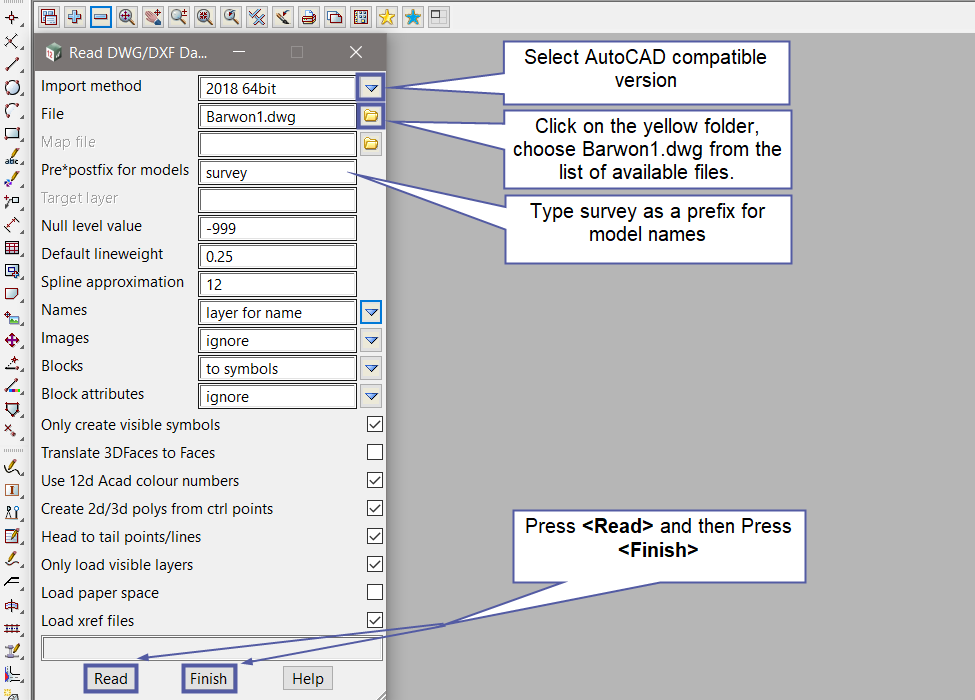
Click the folder icon to browse for your DWG/DXF file.
If the file is not in your current working folder, you can select browse to locate it.

Importing Options

To import a DXF or DWG file into 12d Model, follow these steps, along with some key options to help you control how the data is organized and converted during the import process.

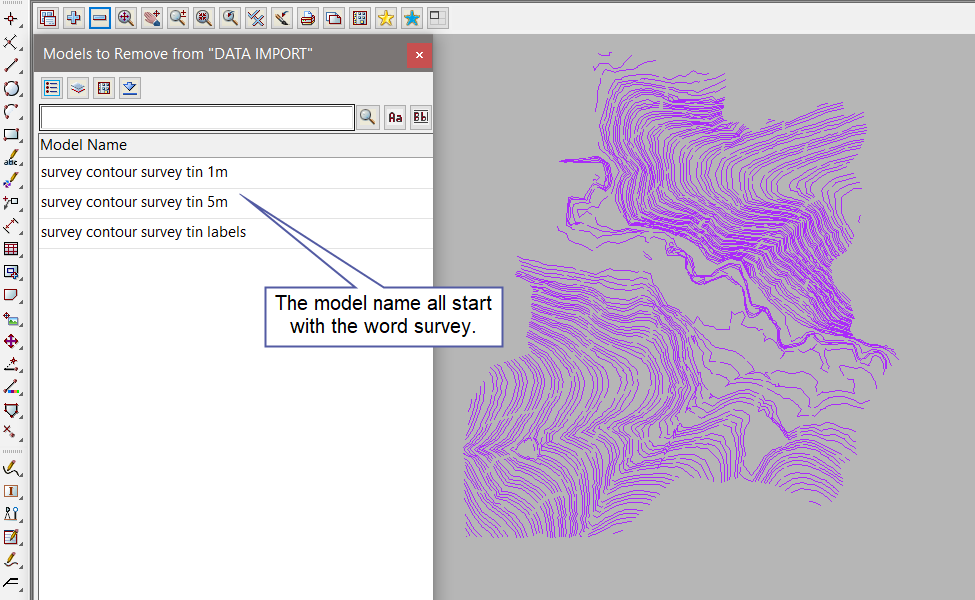
  1. Prefix for Models: Add a prefix (e.g., survey_) to the imported data models. If you use a tree structure, include a forward slash (e.g., survey/). This helps organize your imported data and ensures that models are grouped appropriately, reducing the chance of naming collisions.
  2. Use Map File: If you have a predefined map file, tick this option to apply it during the import. A map file allows you to control which model each layer goes into, convert blocks into points, and define the use of symbols. It’s especially useful when you have specific layer-to-model mappings or block-to-point conversion rules. Click the map file icon to select a file from your User Library.
  3. Block Handling
    • Symbols: The default behavior is to bring blocks into 12d Model as symbols.
    • Points: If you prefer, you can convert CAD blocks into 12d points instead. This option is useful if you’re using a map file for better control over block handling. Choosing between symbols and points will depend on how you plan to use the imported blocks. Symbols are useful for visual representation, while points are better for geometric data.
  4. Null Level Value: Set a value (e.g., -999) for null heights. This is often used for triangle faces with a height of zero or for handling data that doesn’t have specific elevations. This helps ensure your imported data is interpreted correctly, especially when dealing with flat or non-elevated surfaces in the DXF/DWG file.
  5. Read Button: After configuring the settings, click the Read button to begin the import process. The Read button initiates the import, and the data will appear in Plan View once the process is complete. This is your final step to bringing the DXF/DWG data into your 12d Model project.

Additional Tips:

  • Units Check: Ensure that the units in your DXF or DWG file match the units in your 12d Model project to avoid scaling issues during the import process.
  • Layer Management: If the DXF/DWG file contains multiple layers, you can selectively import or exclude certain layers based on your project’s needs.

By using these options, you can efficiently import DXF and DWG files into 12d Model, ensuring that the data is organized, accurate, and ready for further modeling or analysis.

This post was created using 12d Model version 15.0C1s

Tagged: