Pre-Start Checklist
- Check with C.R. Kennedy that your Leica Instrument has the 3rd Party GEOCOM Module licence activated. This allows the Leica Instrument to use 3rd Party applications like 12d Field and provides the correct communications for power searching etc.
- Have the RH16 Radio Handle connected to the top of the Leica Instrument. This allows the use of long-range bluetooth.
- The tablet has the Codemeter Dongle Drivers installed, search Codemeter in the 12d Wiki for the correct post to download the dongle drivers.
- The Codemeter Dongle has been certified within the past 60 days, again search the 12d Wiki for the correct post on how to certify your dongle.
- The tablet has the latest version 12d Model installed on the tablet.
- The 12d Model Nodes file is in the correct location and not expired. Usually C:\12d\14.00 or C:\12d\12.00
- Run a test – Open up the 12d Model project and go into Survey => 12d Field => 12d Field and set the instrument as the TPS Simulator to make sure 12d Field is running before you being with the connection.
- Ensure that Windows updates are turned OFF (or done after hours) while not using 12d Field as Windows has been know to minimise resources (Bluetooth) before and during a scheduled update.
Leica Instrument
Turn your Leica Instrument ON and Level it up.
Once turn ON, select “Settings” from the rolling widget located at the bottom left hand corner of the instrument screen.

Then select “Connections”
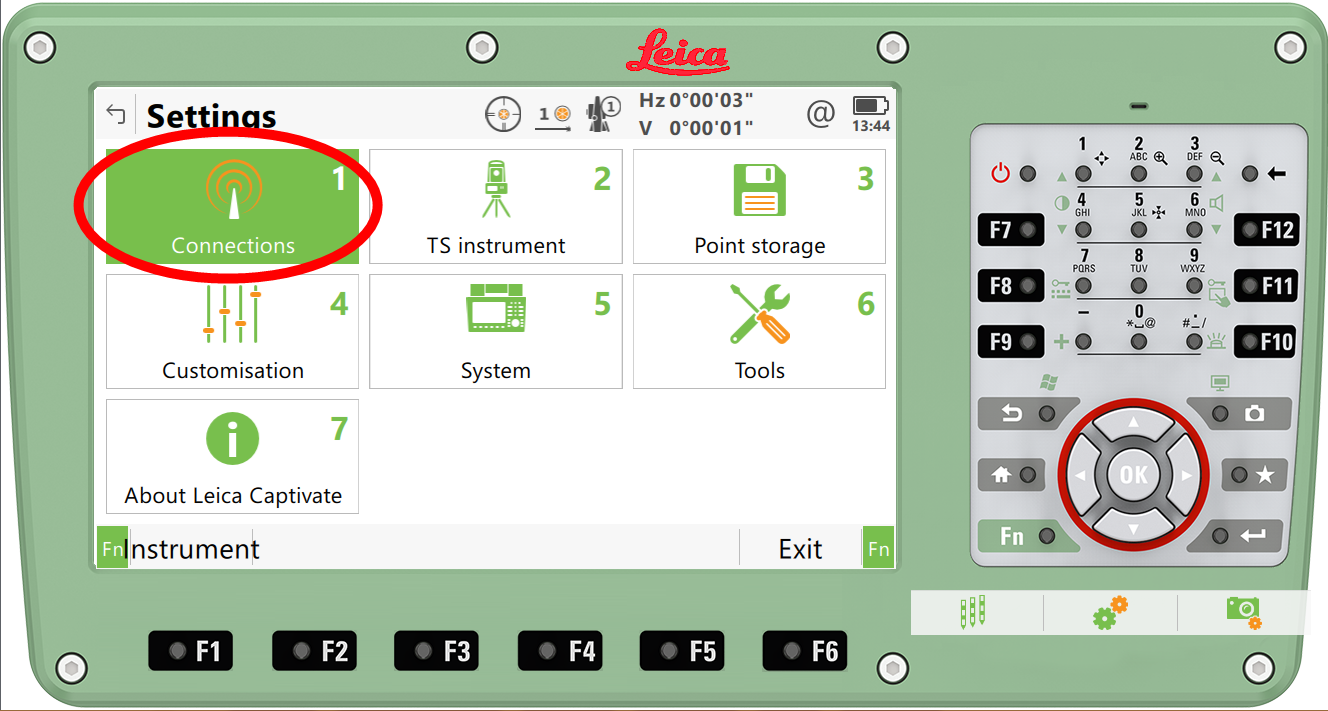
Select “All Other Connections”

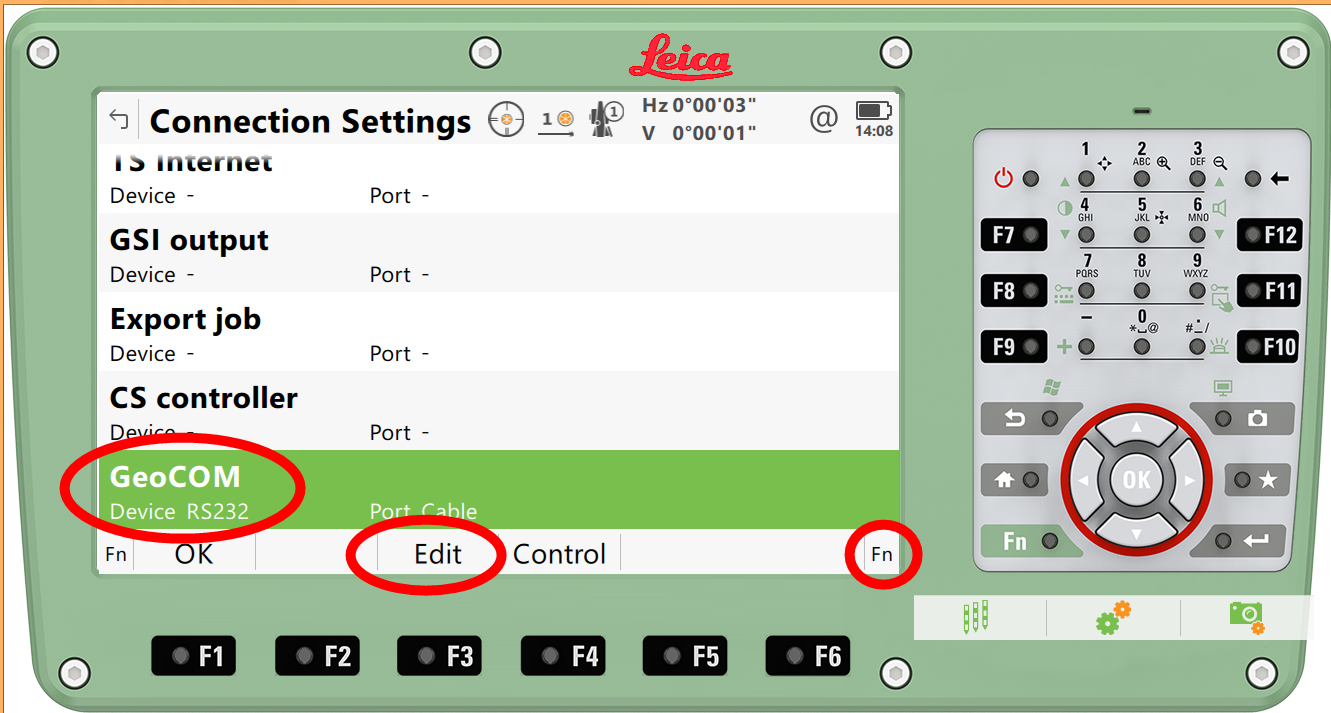
Scroll down the list and select GeoCOM.
You might need to press the Fn icon to bring up the “Edit” option at the bottom of the display.
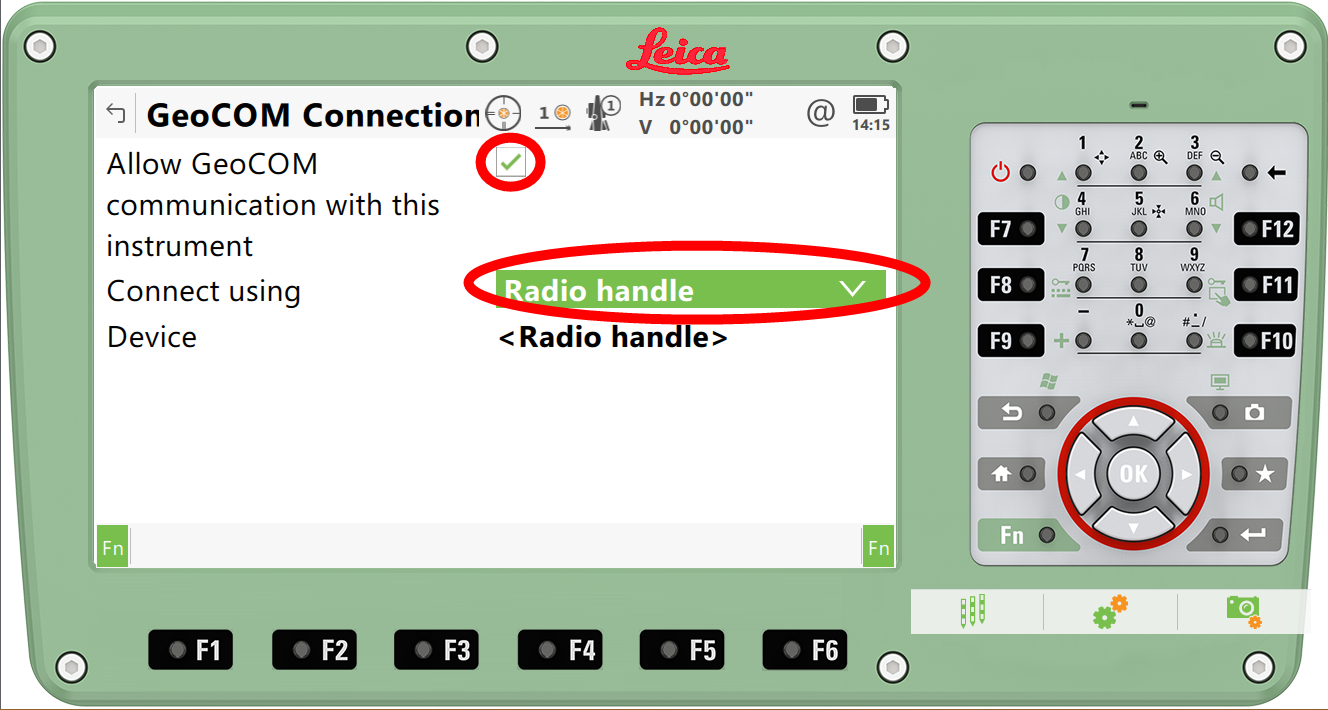
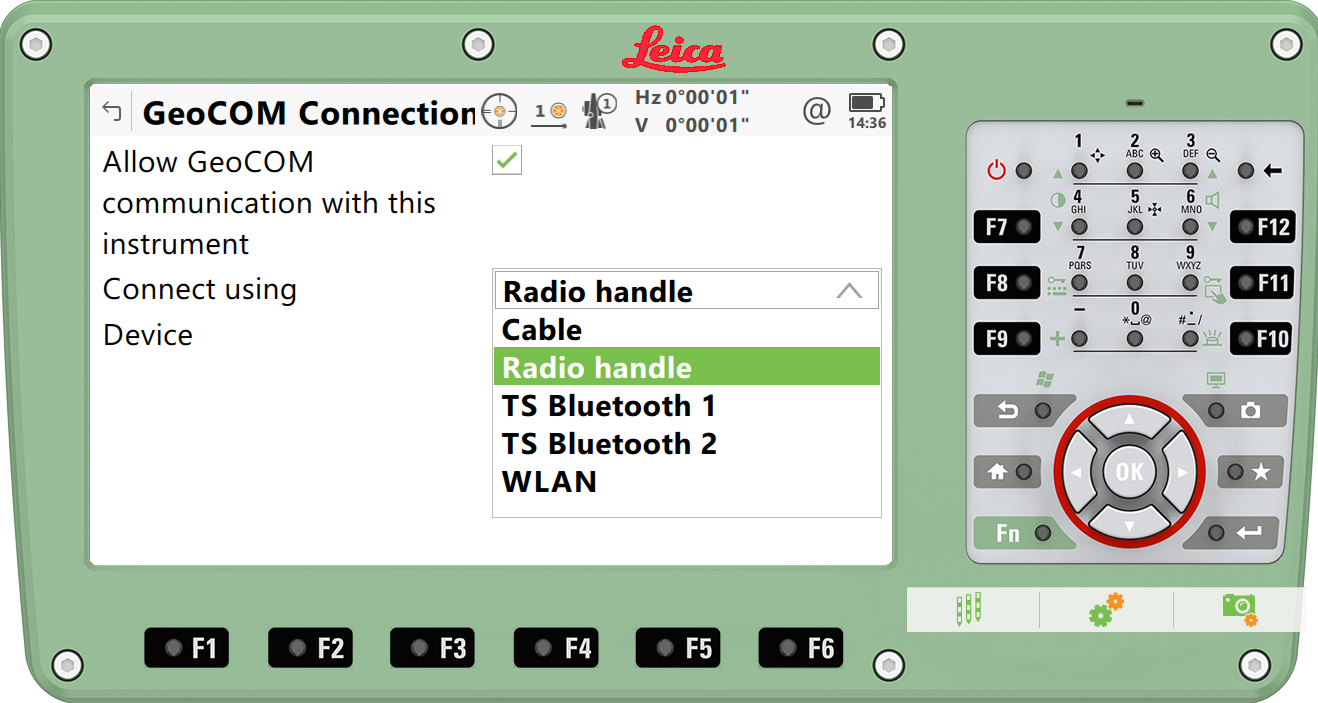
Tick on “Allow GeoCOM communication with this instrument.
Go to Connect Device and select “Radio Handle” as you are connecting through the RH16 radio handle.
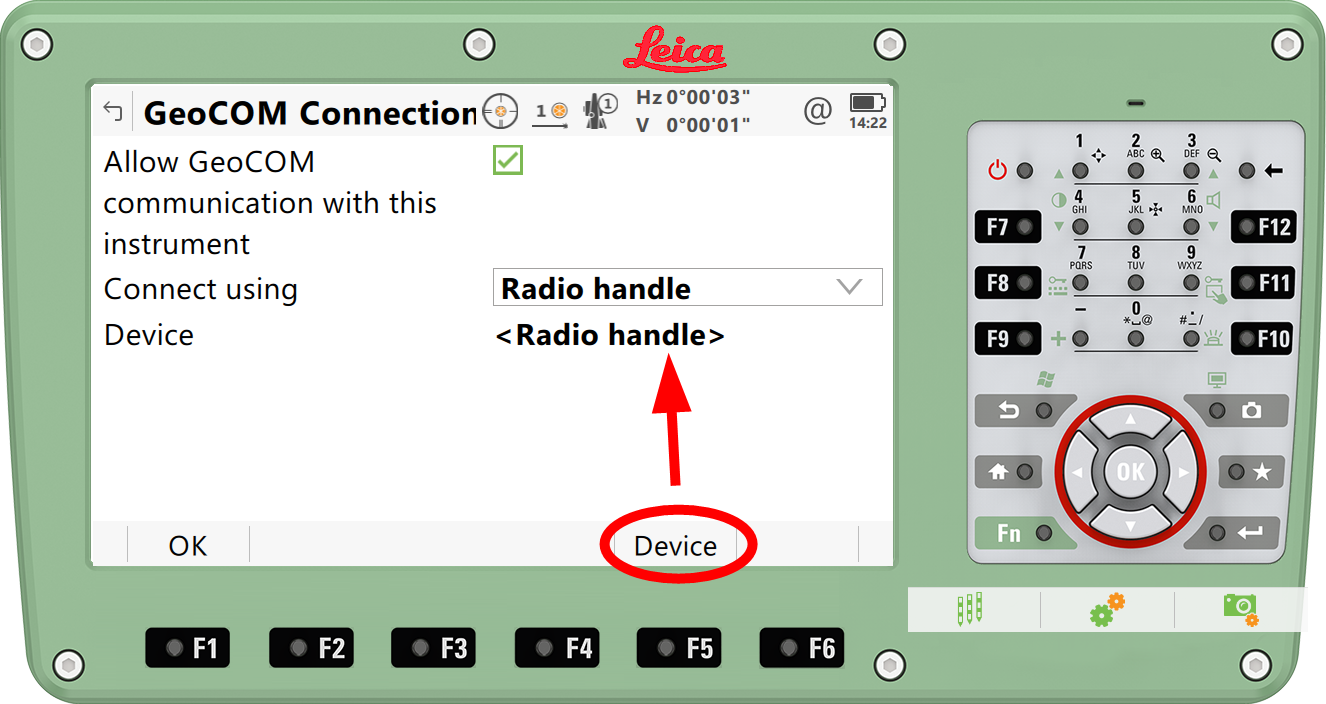
You now need to change the Device to the RH16.
Select the Fn icon and select Device at the bottom of the display.
Select Radio at the top of the display.
This will bring up a list of all the Leica compatible radio’s.
Select “RH16” from the list.

Select OK or press Enter.
The RH16 radio handle should be selected.

Press OK to go back to the default home screen.

For troubleshooting some of the other connections are handy.
Cable – Can be used with an RS232 Cable to detect if the problem is to do with the instrument or the radio handle as it will bypass using the radio handle and bluetooth connections.
TS Bluetooth – Can be used to test the bluetooth connection using the standard in-built short range (up to 15m) bluetooth connection.
Tablet Bluetooth Setup

Make sure the RH16 radio handle is up and lights are on so you know it is ready to transmit data.
Login to tablet and let Windows load up and go to your desktop (home) screen.
Move the cursor to the bottom right hand side where the date and time are located.
You should see a bunch of taskbar icons.
If you don’t have the standard blue and white bluetooth icon you will have to select the triangle icon as shown below.
You should find the bluetooth icon and select it.

Select “Add a bluetooth device”
This will then search for all bluetooth devices including the RH16 radio handle.
You should see a device called RHxxxxx as this is the RH16 Radio Handle and NOT the short range bluetooth on the instrument which is shown as TSxxxxx or MSxxxxxx depending on whether you are using a TS15,16 or MS50,60.
xxxxxx is generally the serial number of the instrument.
Select this device and connect.

Generally Custom Bluetooth Setups are the best when creating the bluetooth device connection.
Once you are connected you need to take note of the COM Port number. Beware that this isn’t permanently the same number all the time and it can change especially with Windows Updates.
To check the COM Port number right click on the device and go into Properties.
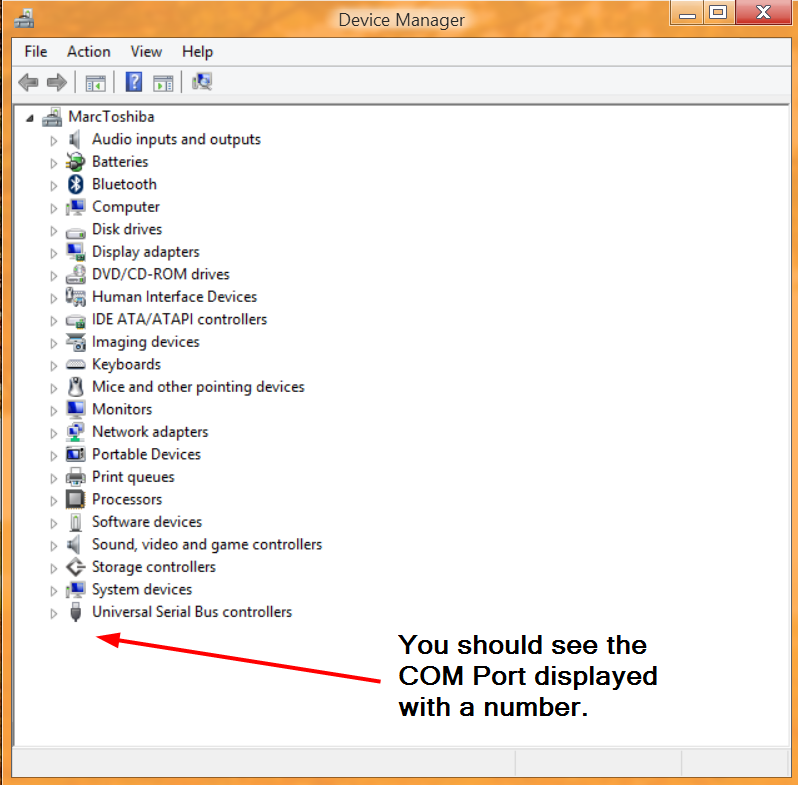
Or alternative go into the Control Panel and go into the Device Manager. Easiest way is to use the Windows search bar. Select the Device Manager.

You should see your COM Port displayed with a number.
Remember that number as we need to use it when in 12d Field.
ALSO check that the Baud Rate is set to 115200 so it will match the instrument, this is shown in the COM Port Properties Tab.
12d Field
Start your 12d Model Project and let it load up.
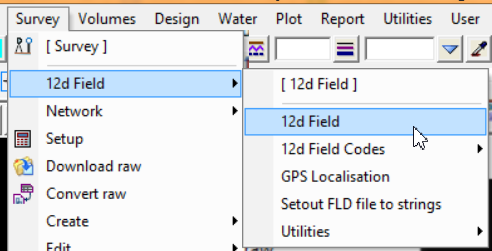
To start 12d Field go to Survey => 12d Field => 12d Field
The 12d Field Configuration panel will open, it will be showing the last configuration that you used,
Click on “Change” to bring up the instrument selection list.

Select the instrument from the dropdown list: TS15, TS16, MS50 or MS60
Type in the Surveyor’s initials or name.
Set the correct scale factor to whatever the calculated scale factor you are given on site. eg 0.99996 as an example (you can change this later inside 12d Field if you need to).
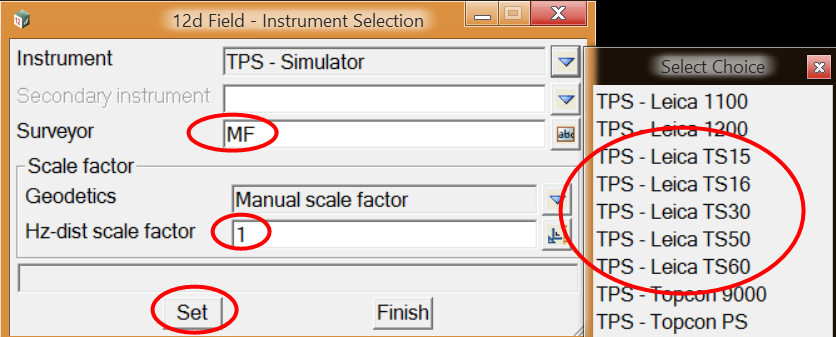
When the correct instrument is selected, press “Set”.
This will open the instrument ‘Configure’ panel for the instrument that you have chosen.
You will need to select the COM port selection.
Type in correct COM Port number that was established earlier during the bluetooth connection. You can get this from the Device Manager as shown earlier.
The Bits per second (Baud Rate) setting for Leica Instruments are set to 115200.
Leave the other settings as shown below.
Press ‘Set’
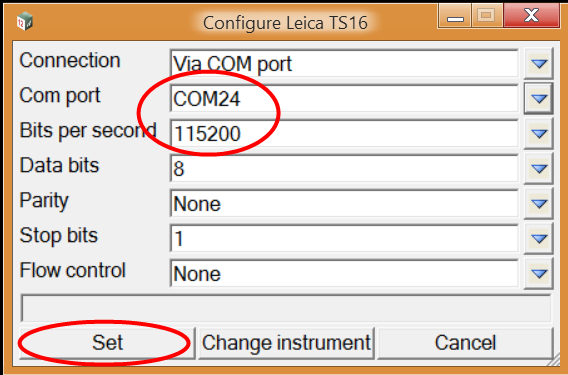
When you press ‘Set’ on the ‘Configure’ panel;
12d Field runs through 5 processes to establish the connection.
You want to see 5 green ticks.
If you get a error when connecting (as shown below), you should check the 12d Model Output window for the reason.
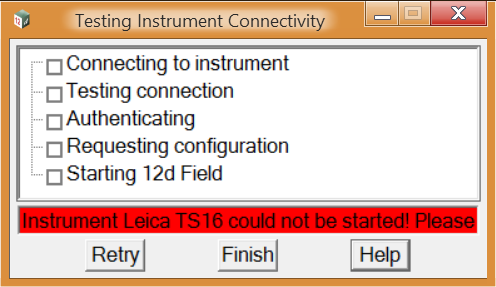

You will have to go through the connection process from the start and make sure all the settings on the Leica Instrument and Tablet are correct.
If you get 5 green ticks 12d Field should start up and you should see the 12d Field Control Bar appear as shown below.

Good News! You are now ready to use 12d Field!