You will need to authorise 12d Model if:
- You have just installed 12d Model on your machine.
See this post for instructions on how install 12d Model. - You have upgraded your license of 12d Model.
The new authorisation file will allow you to use the new modules. - You have been using your Perpetual license of 12d Model for two years.
Standard authorisations for perpetual licenses expire after two years and need to be replaced. - You have a subscription license of 12d Model, and you have renewed your subscription
The authorisation file for 12d Model is usually sent to you as an attachment to an email.
For 12d Model 14 the file is nodes.12d14n
For 12d Model 15 the file is nodes.12d15n
As you would expect the file is often referred to as the ‘nodes file’
To use the authorisation file, simply double-click on it.
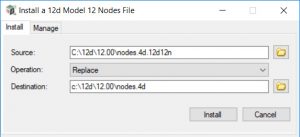
A panel will open as shown below.
Press ‘Install’ to authorise your copy of 12d Model.
The ‘Operation’ can be ‘Prepend’ or ‘Replace’. DO NOT choose ‘Append’.

Some email systems will not allow you to run the attachment from the email. In this case you will need to save the file to your desktop then double-click it.
Auitomatic Installation.
When you double click on the nodes.12dxxn file two thing happen:
- The file is saved to the 14.00 or 15.00 folder (depending on whether is for 12d Model 14 or 12d Model 15)
- The file is renamed to ‘nodes.4d’
If there is already a nodes.4d file in that location, the installer will do one of three things (you get to choose):
- Prepend the authorisation code from the new file into the existing file (add the new authorisation(s) at the top of the file)
If you received your nodes file from 12d Solutions or 12d NZ then the new file may not contain authorisations for all of your dongles.
Choosing ‘Prepend’ is a smart move in this case, as it adds the new authorisations to the top of the existing file, and keeps any existing authoriations in that file. - Replace the existing file with the new file
If you received your new nodes file from EXDS then the new file will have authorisations for all of your dongles in the new file.
Choosing ‘Replace’ is recommended. - Append the authorisation code from the new file into the existing file (add the new authorisation at the bottom of the file)
Not recommended.
Manual Installation
If you want to install your authorisation file by hand, then simply rename it to ‘nodes.4d’ and save it to the C:\12d\14.00 (for V14) or C:\12d\15.00 folder (for V15)
Notes:
- It’s possible to have both V14 and V15 authorisations in the same file. Nothing breaks if you do this.
- It’s possible to set an environment variable for so that 12d Model looks in a non-standard folder for the nodes file.
This is useful if you are working an an office where you have libraries set up on a server or inside 12d Synergy.
All of the machines in the office ‘point’ to a location on the server, and a new nodes file only needs to be saved to that one location.
If you have issues authorising 12d Model, and need to contact support, this one of the things that the support team will check.
(But before you call support, make sure that you have dongle drivers installed.
Failing to install the dongle drivers is the most common issue with authorisation, and the first thing that the support team will check.
Once in 20 years a dongle will fail. Once in 10 years a nodes file will be corrupt. Once a week someone phones support and hasn’t installed the dongle drivers). - Saving the nodes.12dxxn to your desktop does not authorise 12d Model. It just adds a file to your desktop.